AI voiceovers are transforming the way we tell stories in videos. They’re fast, cost-effective, and surprisingly human-like. However, even the most realistic AI voice won’t have the same impact if it doesn’t align with the visuals. The timing has to be right—especially for tutorials, product demos, or storytelling videos. That’s where CapCut Desktop Video Editor shines. With CapCut’s intuitive timeline, Text to Speech AI tools, and drag-and-drop editing, syncing voice with visuals becomes a smooth process—even if you’re not a pro editor.
Why Syncing AI Voice Matters
Imagine a tutorial where the voice says, “Click the settings icon,” but the video shows something else. It feels off. Viewers may get confused or lose interest. Matching the voice with the visuals ensures:
- Clarity: Viewers understand what’s happening without having to guess.
- Engagement: A well-synced video feels smooth and professional.
- Trust: It shows you care about the content’s quality.
Whether you’re making explainer videos, short skits, or ads, syncing AI voiceovers with visuals can elevate your video from amateur to pro level.
Tools You Need: CapCut Desktop
Before diving in, make sure you have CapCut Desktop Video Editor installed. It’s free, beginner-friendly, and packed with AI-powered tools like:
- Text-to-Speech Generator
- Multitrack Timeline
- AI Voice Generator
- Auto Captions and Subtitles
How to Match AI Voice Timing with Visuals in CapCut
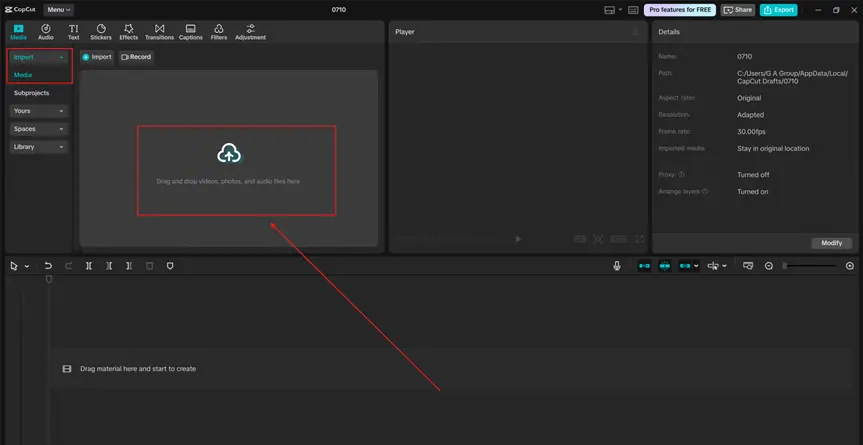
Step 1: Add and Adjust Your Visual Clips
Start by importing all your video clips or images. Open CapCut Desktop Video Editor and click “New Project”. Import your visuals by dragging them into the media library or using the “+” button. Drag each clip to the timeline and arrange them in the sequence you prefer. Trim the visuals to match the length of your script or narration. Keep your scenes short—5 to 8 seconds per clip works well for most explainer or voiceover-led videos.
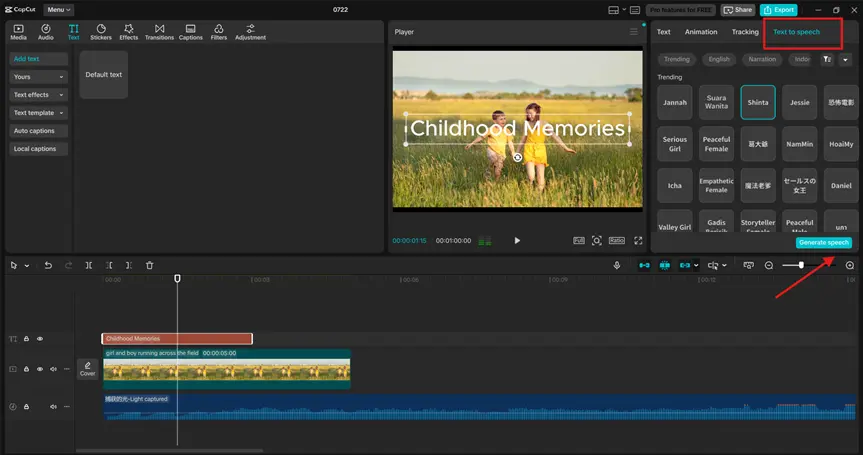
Step 2: Use AI Voice Generator for Your Script
Once your visuals are in place, it’s time to add the narration. Click on “Text” > “Text to speech”. Paste your script or narration into the text box. Choose a voice that suits your content’s tone—CapCut offers a wide range from natural to dramatic or robotic. Adjust the speed or pitch if needed and click “Generate speech” Drag the AI voice track onto the timeline. Break long scripts into smaller chunks. Generate them in sections to make syncing easier.
Step 3: Sync Voice with Visuals on the Timeline
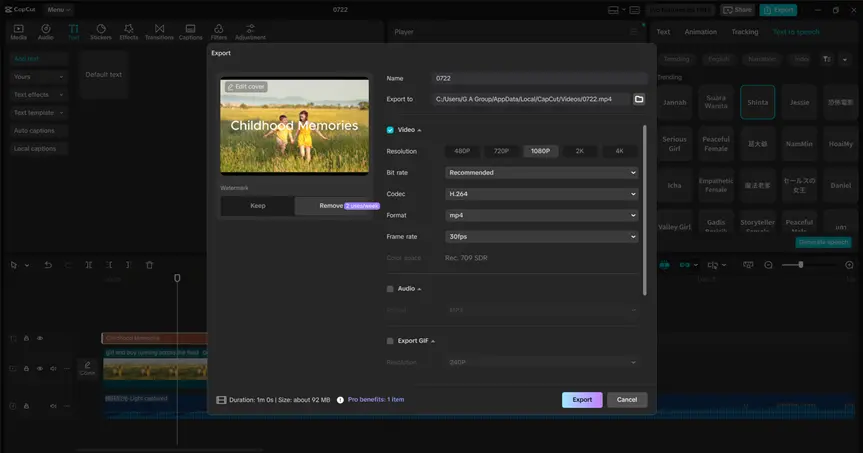
Now comes the important part—matching the voice timing with your visuals. Listen to your AI voice track and locate cue points (e.g., “click here,” “now open,” “then select”). Use the “Split” tool to trim visuals or adjust timing based on the narration. Drag the visual clips on the timeline to align with key phrases. Use AI Video Upscaler to enhance the quality and clarity of your video. Use markers to tag essential moments if needed. Add smooth transitions between scenes to maintain flow. CapCut’s “Auto caaptions” feature can help. By enabling auto captions, you can visually track the spoken words and fine-tune timing with frame-level accuracy. Once you are done, hit the “Export” button and save your video.
Extra Tips for Natural Syncing
1. Match Emotions with Tone
If your AI voice sounds excited, pair it with visuals that convey a dynamic feel—fast cuts, bold movements, or energetic scenes. For calm or reflective narration, use soft transitions and gentle visuals.
2. Use Background Music Wisely
Make sure your music doesn’t overpower the voice. Lower the music volume and fade it in/out using keyframes. CapCut’s audio controls make this easy.
3. Layer Visual Effects
CapCut lets you add stickers, pop-ups, motion text, or highlight effects to match voice cues. For example, when the voice says “Click the red button,” add a pulsing effect on the red button.
4. Slow Down or Speed Up Clips
Right-click on a visual clip and choose “Speed” to adjust playback. This helps when you need visuals to stretch or shrink to match the narration length.
When to Re-record AI Voice
Sometimes syncing isn’t enough—you might need to regenerate part of the voiceover if:
- The pacing feels too fast or slow
- Pauses are missing in important places
- The pronunciation sounds off
CapCut’s Text-to-Speech tool allows quick edits. Just adjust the text, regenerate, and drop it into place.
Final Review: Watch, Tweak, Repeat
After syncing, play the full video from the beginning. Watch it like your audience would. Ask yourself:
- Does the voice guide the visuals?
- Are any parts too rushed or too slow?
- Does it feel like one smooth story?
Make minor adjustments as needed. CapCut’s frame-by-frame editing gives you tight control over timing.
Wrap-Up: Syncing AI Voice Like a Pro
Matching AI voice timing with visuals isn’t just about mechanics—it’s about storytelling. CapCut Desktop makes the process smooth with its intuitive tools and flexible editing features. By following this guide, your video will not only sound good but also feel right. That’s the key to keeping viewers engaged and making your content look professionally made—even if it’s your first try. Want more smart editing tricks? Try CapCut’s AI Video Generator, Voice Changer, to take your videos to the next level.
Also Read-Innovative Test Generation Techniques for Modern Applications