A refrigerator that’s not cooling properly can be a major inconvenience, leading to spoiled food and frustration. Whether you’re dealing with warm perishables or a freezer that’s failing to keep things frozen, addressing the issue promptly is crucial. This comprehensive guide will walk you through the steps to diagnose and fix a refrigerator that’s not cooling, offering practical solutions for homeowners in North Vancouver and beyond. For professional assistance, consider reaching out to trusted professional refrigerator repair services like those at North Vancouver Appliances.
Understanding Why Your Refrigerator Isn’t Cooling
Before diving into repairs, it’s important to understand the potential causes of a refrigerator not cooling. A refrigerator’s cooling system relies on several components working together, including the compressor, condenser coils, evaporator coils, and thermostat. Common issues include:
-
Dirty condenser coils: Dust and debris can reduce the coils’ ability to release heat.
-
Faulty evaporator fan: This fan circulates cold air; if it fails, the fridge won’t cool properly.
-
Thermostat issues: Incorrect settings or a malfunctioning thermostat can disrupt cooling.
-
Blocked vents: Obstructed airflow inside the fridge can prevent proper cooling.
-
Low refrigerant levels: Leaks or improper refrigerant levels can impair cooling efficiency.
-
Compressor problems: A failing compressor can’t circulate refrigerant effectively.
By systematically checking these components, you can identify the root cause and decide whether to fix it yourself or call professionals like those at North Vancouver Appliances.
Step-by-Step Guide to Fixing a Refrigerator That’s Not Cooling
Step 1: Check the Power Supply
A refrigerator that’s not cooling might not be receiving power. Start by ensuring the appliance is properly plugged in and the outlet is functional.
-
Verify the plug: Ensure the refrigerator’s power cord is securely plugged into the outlet. Check for any damage to the cord.
-
Test the outlet: Plug another device into the same outlet to confirm it’s working. If the outlet is dead, check your circuit breaker or fuse box for tripped breakers or blown fuses.
-
Inspect the circuit breaker: If the breaker has tripped, reset it. If it trips again, there may be an electrical issue requiring professional attention.
If the power supply is fine but the fridge still isn’t cooling, move to the next step.
Step 2: Adjust the Thermostat Settings
Incorrect thermostat settings are a common cause of cooling issues. The refrigerator and freezer compartments should be set to the manufacturer’s recommended temperatures, typically 37–40°F (3–4°C) for the fridge and 0°F (-18°C) for the freezer.
-
Locate the thermostat: Most refrigerators have a dial or digital control panel inside the fridge or freezer compartment.
-
Check the settings: Ensure the thermostat is set to the correct temperature. If it’s too high, adjust it and wait 24 hours to see if cooling improves.
-
Test the thermostat: If you suspect the thermostat is faulty, use a multimeter to check for continuity. A lack of continuity indicates a defective thermostat that needs replacement.
If adjusting the thermostat doesn’t resolve the issue, proceed to inspect the refrigerator’s internal components.
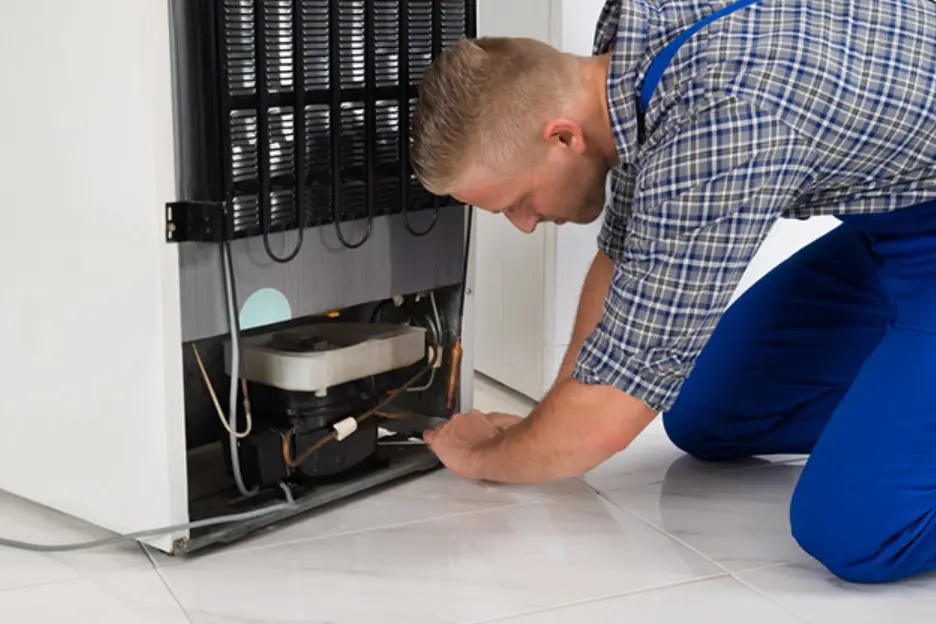
Step 3: Clean the Condenser Coils
Condenser coils, located at the back or bottom of the refrigerator, release heat from the refrigerant. Dirty coils can significantly reduce cooling efficiency.
-
Unplug the refrigerator: Always disconnect the power before performing maintenance to ensure safety.
-
Locate the coils: Check your refrigerator’s manual to find the condenser coils. They’re typically behind a rear panel or under the unit.
-
Clean the coils: Use a vacuum cleaner with a brush attachment or a coil cleaning brush to remove dust, pet hair, and debris. Be gentle to avoid damaging the coils.
-
Check for airflow: Ensure there’s enough space around the refrigerator for proper ventilation, ideally 2–3 inches at the back and sides.
After cleaning, plug the refrigerator back in and monitor its performance for 24 hours. If it’s still not cooling, continue troubleshooting.
Step 4: Inspect the Evaporator Fan
The evaporator fan circulates cold air from the freezer to the refrigerator compartment. If it’s not working, the fridge may feel warm even if the freezer is cold.
-
Listen for the fan: Open the freezer door and listen for a humming sound. If it’s silent, the fan may be faulty.
-
Access the fan: Unplug the refrigerator and remove the back panel inside the freezer to locate the evaporator fan.
-
Check for obstructions: Ensure no ice or debris is blocking the fan blades. If ice is present, defrost the freezer (see Step 5).
-
Test the fan motor: Use a multimeter to check the fan motor for continuity. If it’s defective, replace it with a compatible part.
A malfunctioning evaporator fan often requires professional replacement, so consider contacting North Vancouver Appliances for expert service.
If your refrigerator is still not cooling after checking the basics, it might be time to consider replacing some parts. A malfunctioning thermostat, compressor, or evaporator fan could be the culprit. To ensure you get the right components, turn to a trusted source for refrigerator parts. This will help you find high-quality replacements that match your refrigerator model, ensuring a proper fit and function. Once you have the necessary parts, follow the manufacturer’s instructions for installation, or consult a professional if you’re unsure. By addressing these potential issues, you can restore your refrigerator’s cooling efficiency and extend its lifespan.
Step 5: Defrost the Freezer
Excess frost buildup in the freezer can block airflow, preventing the refrigerator from cooling properly. Many modern refrigerators have an auto-defrost function, but it may fail over time.
-
Check for frost: Look for thick ice buildup on the evaporator coils or inside the freezer.
-
Manual defrosting: Unplug the refrigerator, remove all food, and leave the doors open for 8–12 hours to allow the ice to melt. Place towels around the base to catch water.
-
Inspect the defrost system: If frost buildup recurs frequently, the defrost heater, defrost thermostat, or defrost timer may be faulty. Test these components with a multimeter or call a professional.
Regular defrosting can prevent future issues, but persistent problems may indicate a deeper issue requiring expert diagnosis.
Step 6: Check the Door Gaskets
Worn or damaged door gaskets can allow warm air to enter the refrigerator, reducing cooling efficiency.
-
Inspect the gaskets: Look for cracks, tears, or dirt on the rubber seals around the fridge and freezer doors.
-
Perform the dollar bill test: Close the door on a dollar bill. If you can pull it out easily, the gasket isn’t sealing properly.
-
Clean or replace the gaskets: Clean dirty gaskets with warm, soapy water. If they’re damaged, replace them with a model-specific gasket.
Properly sealing doors are essential for maintaining consistent temperatures. If the gaskets are fine, move to the next step.
Step 7: Examine the Compressor and Condenser Fan
The compressor and condenser fan are critical for circulating refrigerant and dissipating heat. A failure in either can cause cooling problems.
-
Listen for compressor noise: A working compressor produces a low hum. If it’s silent or making unusual noises (clicking, buzzing), it may be faulty.
-
Check the condenser fan: Located near the compressor, this fan should spin freely. Clear any debris and test the motor with a multimeter if it’s not working.
-
Test the compressor: Use a multimeter to check the compressor’s start relay and windings. Compressor issues are complex and often require professional repair.
Due to the technical nature of compressor repairs, it’s wise to contact a service like North Vancouver Appliances for assistance.
Step 8: Verify Refrigerant Levels
Low refrigerant levels, often caused by leaks, can prevent the refrigerator from cooling. However, handling refrigerant requires specialized tools and certifications.
-
Look for signs of a leak: Oily residue near the compressor or coils may indicate a refrigerant leak.
-
Avoid DIY refrigerant repairs: Adding or replacing refrigerant is regulated and should only be done by licensed technicians.
If you suspect a refrigerant issue, schedule a service appointment with a professional repair team.
Step 9: Check for Blocked Air Vents
Blocked vents inside the refrigerator can restrict airflow, causing uneven cooling.
-
Rearrange food items: Ensure food isn’t blocking vents in the fridge or freezer compartments.
-
Check the damper control: Some refrigerators have a damper that controls airflow between compartments. Ensure it’s functioning and not stuck.
Clearing vents can often resolve minor cooling issues quickly.
Step 10: Monitor and Test After Repairs
After addressing the issue, monitor the refrigerator’s performance:
-
Allow time for cooling: It may take 24 hours for the fridge to stabilize after repairs.
-
Use a thermometer: Place a thermometer in the fridge and freezer to verify temperatures are within the recommended range.
-
Check for consistency: Ensure both compartments maintain steady temperatures without frequent cycling.
If the refrigerator still isn’t cooling properly, the issue may be more complex, requiring professional diagnosis.
When to Call a Professional
While many refrigerator issues can be resolved with basic troubleshooting, some problems—such as compressor failures, refrigerant leaks, or electrical faults—require specialized skills and tools. Attempting to fix these yourself can lead to further damage or safety hazards. If you’re unsure or the problem persists, contact a reputable refrigerator repair service like North Vancouver Appliances. Their experienced technicians can diagnose and fix complex issues efficiently, ensuring your refrigerator runs smoothly.
Preventive Maintenance Tips
To avoid future cooling problems, incorporate these maintenance practices:
-
Clean condenser coils regularly: Dust them every 6–12 months to maintain efficiency.
-
Check door gaskets: Clean and inspect gaskets periodically to ensure a tight seal.
-
Avoid overloading: Don’t overfill the fridge, as this can block vents and strain the system.
-
Schedule professional maintenance: Annual checkups by a service like North Vancouver Appliances can catch issues early.
Common Refrigerator Brands and Their Quirks
Different refrigerator brands may have unique features or common issues:
-
Samsung: Known for complex electronics, Samsung fridges may require specialized diagnostics for control board issues.
-
LG: LG models often have linear compressors, which can be prone to failure and require professional repair.
-
Whirlpool: These fridges are reliable but may experience evaporator fan or defrost system issues over ti